Remote Repositories
Overview
Teaching: 10 min
Exercises: 5 minQuestions
How can I use Mercurial to store information on other machines?
Objectives
Explain what remote repositories are and why they are useful.
Explain what happens when a remote repository is cloned.
Explain what happens when changes are pushed to or pulled from a remote repository.
By now it should be obvious that version control is a powerful tool for organizing our own work on our personal laptop or workstation. It helps us keep track of what we did when, gives us the ability to go back in time in our project’s history, and can help us recover from mistakes. But there’s more…
Mercurial allows us to move our work among copies (clones, actually) of our repositories on different machines. We can use that capability to synchronize files and metadata between our laptop and a lab workstation, or between computers at home and at work, or between our local computer and an HPC cluster, etc. While it is possible to move files and metadata between any two repository copies, in practice it’s easiest to use one copy as a central hub.
The easiest way to set up a copy of a repo as a central hub that we can access from anywhere that we have a network connection is to use a hosting service like Bitbucket.
Let’s start by putting a copy of our Salish Sea forecast planning repo on Bitbucket.
Log in to the Bitbucket site,
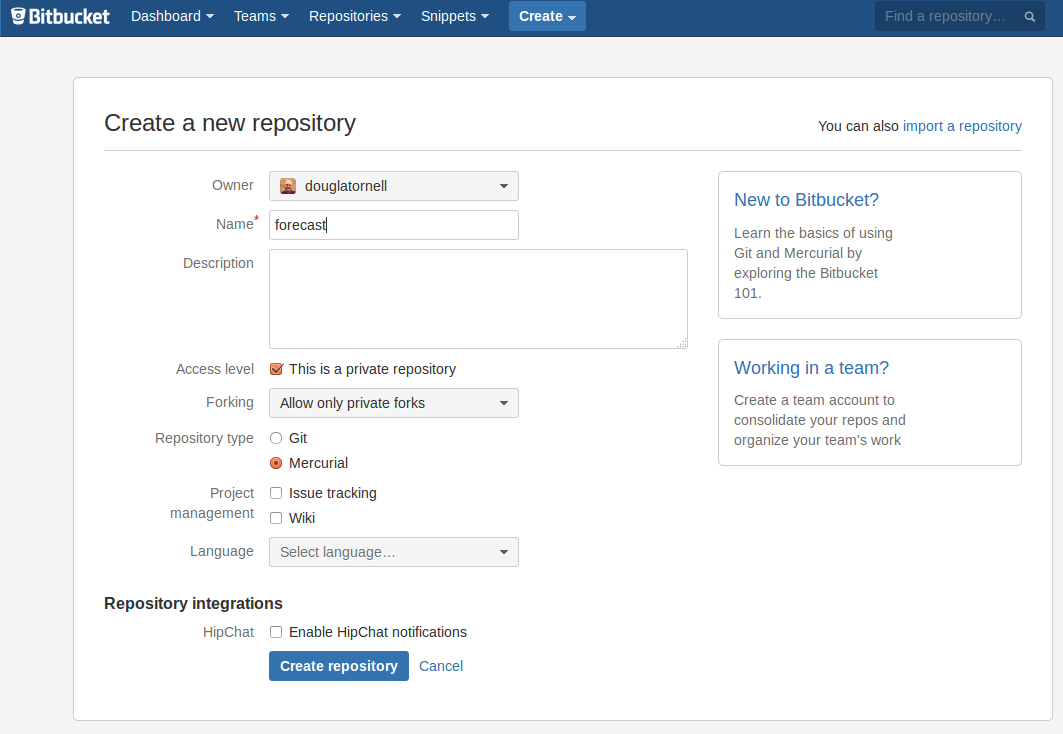
then click on Create repository under the Create menu at the top of the page:

Name your repository forecast and then click Create Repository:
As soon as the repository is created, Bitbucket displays a page with a URL and some information on how to configure your local repository:
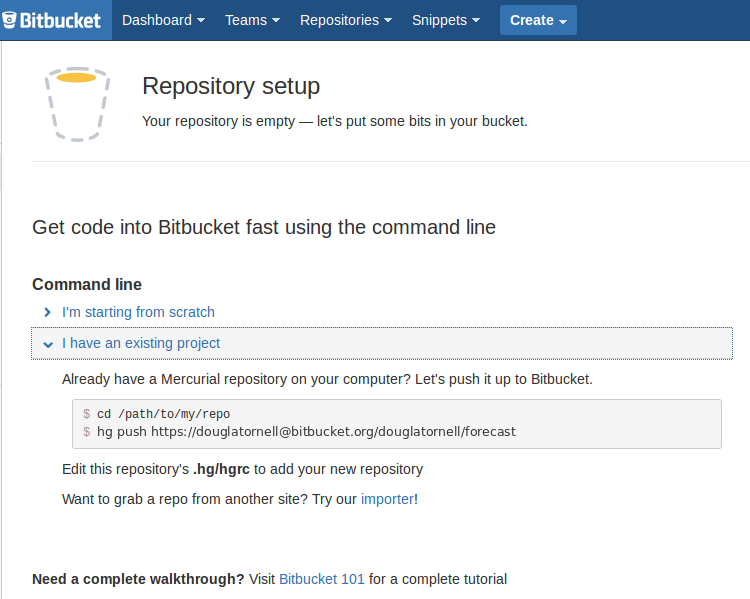
Select I have an existing project,
and use the commands shown to “push” the files and metadata from your local `
forecast` repo to the newly created one on Bitbucket:
$ cd forecast
$ hg push https://bitbucket.org/susan/forecast
The output from that hg push command should look like:
pushing to https://bitbucket.org/susan/forecast
searching for changes
http authorization required for https://bitbucket.org/susan/forecast
realm: Bitbucket.org HTTP
user: susan
password:
remote: adding changesets
remote: adding manifests
remote: adding file changes
remote: added 3 changesets with 3 changes to 1 files
You will have to type your own Bitbucket user name and password.
The hg push command brought the repository on Bitbucket’s server up-to-date with the one on our own machine.
Our local and remote repositories are now in this state:

The next step is to connect the two repositories so that we don’t have to type
the URL every time we do something with Bitbucket.
We do this by making the Bitbucket repository a remote for the local repository.
You’ll need the URL for the Bitbucket repository,
which is the same URL from the hg push statement above.
Use the command:
$ hg config --local
to open your local repository’s configuration file in your editor. You should see a template file that looks like:
# example repository config (see "hg help config" for more info)
[paths]
# path aliases to other clones of this repo in URLs or filesystem paths
# (see "hg help config.paths" for more info)
#
# default      = http://example.com/hg/example-repo
# default-push = ssh://jdoe@example.net/hg/jdoes-fork
# my-fork      = ssh://jdoe@example.net/hg/jdoes-fork
# my-clone     = /home/jdoe/jdoes-clone

[ui]
# name and email (local to this repository, optional), e.g.
# username = Jane Doe <jdoe@example.com>
Edit the file so that it has just 2 lines:
[paths]
default = https://bitbucket.org/susan/forecast
Make sure to use the URL with your Bitbucket username in it rather than susan
(the one from the hg push command above).
Save the file.
It will automatically be stored in forecast/.hg/hgrc.
hg: unknown command ‘config’
If your computer responds to the
hg config --localcommand withhg: unknown command 'config'it means that you are using a version of Mercurial older than 3.0 that doesn’t have the
hg configcommand.You will have to create your local repository’s configuration file from scratch. Use:
nano .hg/hgrcto create the appropriately named empty file and then type in the 2 lines above.
We can check that the command has worked by running hg paths:
$ hg paths
default = https://bitbucket.org/susan/forecast
Now that the default path is set up, we won’t need to specify the
target URL when we run hg push in the future; running hg push
will automatically push the changes from our local repository
to the repository on Bitbucket:
$ hg push
pushing to https://bitbucket.org/susan/forecast
searching for changes
http authorization required for https://bitbucket.org/susan/forecast
realm: Bitbucket.org HTTP
user: susan
password:
no changes found
As before, you will have to type your own Bitbucket user name and password.
This push has no effect because the two repositories are already synchronized.
We can pull changes from the remote repository to the local one as well:
$ hg pull
pulling from https://bitbucket.org/susan/forecast
searching for changes
http authorization required for https://bitbucket.org/susan/forecast
realm: Bitbucket.org HTTP
user: susan
password:
no changes found
Pulling also has no effect in this case because the two repositories are already synchronized. If we had pushed some changes to the repository on Bitbucket from a clone on another machine, though, this command would download them to our local repository.
Bitbucket Timestamp
Create a repository on Bitbucket, clone it, add a file, push those changes to Bitbucket. Look at the timestamp of the change on Bitbucket. How does Bitbucket record times, and why?
Using ssh Key Authentication
Typing your user name and password every time that you interact with Bitbucket is really tedious. There is an alternative mechanism based on a pair of ‘ssh’ encryption keys that you can generate for yourself. Getting that set up is a distraction from the topics of this workshop, but after the workshop you should read the Bitbucket Setting up SSH for Mercurial documentation on your own and set up ssh keys for yourself.
Key Points
Use
hg pushto push changes to remote repositories.Use
hg pullto pull changes from remote repositories.