
Version Control with Mercurial
Collaborating
Learning Objectives
- Explain what remote repositories are and why they are useful.
- Explain what happens when a remote repository is cloned.
- Explain what happens when changes are pushed to or pulled from a remote repository.
Version control really comes into its own when we begin to collaborate with other people. We already have most of the machinery we need to do this; the only thing missing is to copy changes from one person’s repository to another.
Systems like Mercurial allow us to move work between any two repositories. In practice, though, it’s easiest to use one copy as a central hub, and to keep it on the web rather than on someone’s laptop. Most programmers use hosting services like Bitbucket and similar to hold those master copies; we’ll explore the pros and cons of this in the final section of this lesson.
Let’s start by sharing the changes we’ve made to our current project with the world. Log in to Bitbucket, then click on the icon in the top right corner to create a new repository called planets:

Creating a Repository on Bitbucket (Step 1)
Name your repository “planets” and then click “Create Repository”:
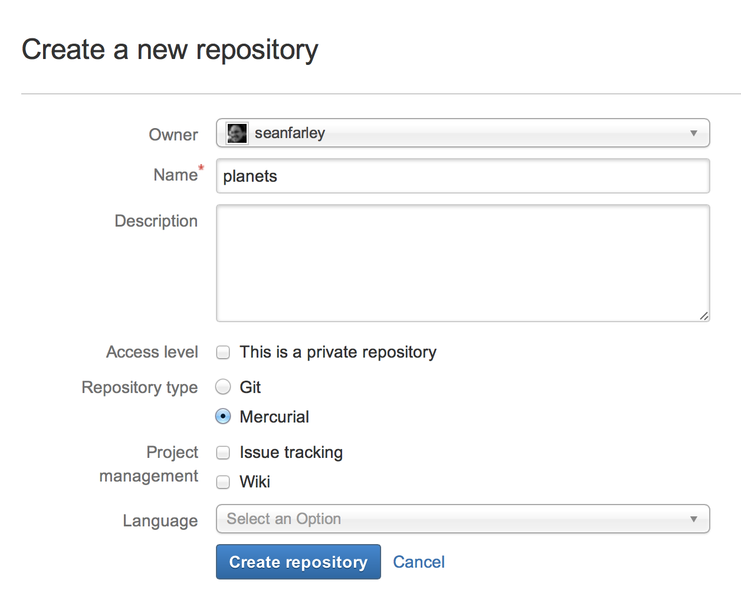
Creating a Repository on Bitbucket (Step 2)
As soon as the repository is created, Bitbucket displays a page with a URL and some information on how to configure your local repository:
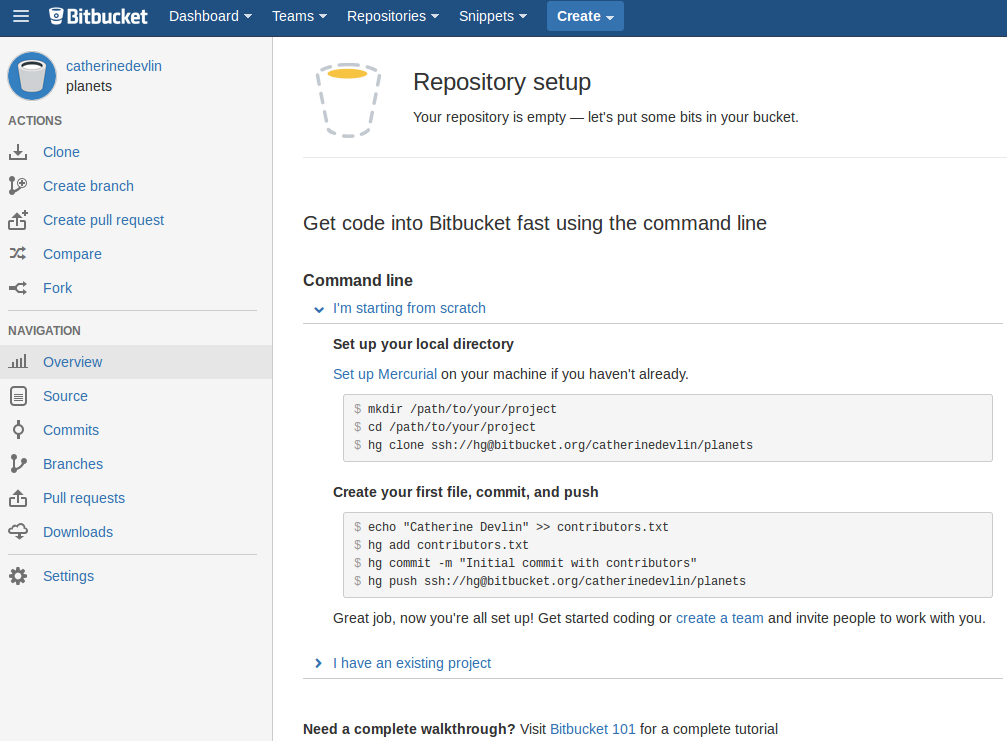
Creating a Repository on Bitbucket (Step 3)
Select “I have an existing project”. We’re going to use a slight variation on those instructions. From within your planets directory, issue a command like:
$ hg push https://bitbucket.org/vlad/planetsIt’s similar to the one shown under “I have an existing project” on the Bitbcucket page, but the URL should have your Bitbucket user name in it instead of vlad, and be prefixed with https://, not ssh://hg@.
The output from that command should look like:
pushing to https://bitbucket.org/vlad/planets
searching for changes
http authorization required for https://bitbucket.org/vlad/planets
realm: Bitbucket.org HTTP
user: vlad
password:
remote: adding changesets
remote: adding manifests
remote: adding file changes
remote: added 3 changesets with 3 changes to 1 files
You will have to type your own Bitbucket user name and password.
This brings the repository on Bitbucket’s server up-to-date with the one on our own machine. Our local and remote repositories are now in this state:

Bitbucket Repository After First Push
The next step is to connect the two repositories so that we don’t have to type the URL every time we do something with Bitbucket. We do this by making the Bitbucket repository a remote for the local repository. You’ll need the URL for the Bitbucket repository, which is the same URL from the hg push statement above.
Use the command:
$ hg config --localto open your local repository’s configuration file in your editor. You should see a template file that looks like:
# example repository config (see "hg help config" for more info)
[paths]
# path aliases to other clones of this repo in URLs or filesystem paths
# (see "hg help config.paths" for more info)
#
# default      = http://example.com/hg/example-repo
# default-push = ssh://jdoe@example.net/hg/jdoes-fork
# my-fork      = ssh://jdoe@example.net/hg/jdoes-fork
# my-clone     = /home/jdoe/jdoes-clone

[ui]
# name and email (local to this repository, optional), e.g.
# username = Jane Doe <jdoe@example.com>
Edit the file so that it has just 2 lines:
[paths]
default = https://bitbucket.org/vlad/planets
Make sure to use the URL for your repository rather than Vlad’s (the one from the hg push command above), and that the prefix in the URL is https://, not ssh://hg@.
Save the file. It will automatically be stored in planets/.hg/hgrc.
We can check that the command has worked by running hg paths:
$ hg pathsdefault = https://bitbucket.org/vlad/planetsNow that the default path is set up, we won’t need to specify the target URL when we run hg push in the future; running hg push will automatically push the changes from our local repository to the repository on Bitbucket:
$ hg pushpushing to https://bitbucket.org/vlad/planets
searching for changes
no changes foundThis push has no effect because the two repositories are already synchronized.
We can pull changes from the remote repository to the local one as well:
$ hg pullpulling from https://bitbucket.org/vlad/planets
searching for changes
no changes foundPulling has no effect in this case because the two repositories are already synchronized. If someone else had pushed some changes to the repository on Bitbucket, though, this command would download them to our local repository.
We can simulate working with a collaborator using another copy of the repository on our local machine. To do this, cd to the directory /tmp. (Note the absolute path: don’t make tmp a subdirectory of the existing repository). Instead of creating a new repository here with hg init, we will clone the existing repository from Bitbucket:
$ cd /tmp
$ hg clone https://bitbucket.org/vlad/planets
hg clone creates a fresh local copy of a remote repository. (We did it in /tmp or some other directory so that we don’t overwrite our existing planets directory.) Our computer now has two copies of the repository:

After Creating Duplicate Clone of Repository
Let’s make a change in the copy in /tmp/planets:
$ cd /tmp/planets
$ nano pluto.txt
$ cat pluto.txt
It is so a planet!$ hg add pluto.txt
$ hg commit -m "Some notes about Pluto"then push the change to Bitbucket:
$ hg pushpushing to https://bitbucket.org/vlad/planets
searching for changes
adding changesets
adding manifests
adding file changes
added 1 changesets with 1 changes to 1 filesNote that we didn’t have to create a remote called default: Mercurial does this automatically, using that name, when we clone a repository. (This is why default was a sensible choice earlier when we were setting up remotes by hand.)
Our three repositories now look like this:

After Pushing Change from Duplicate Repository
We can now download changes into the original repository on our machine:
$ cd ~/planets
$ hg pull
pulling from https://bitbucket.org/vlad/planets
searching for changes
adding changesets
adding manifests
adding file changes
added 1 changesets with 1 changes to 1 files
(run 'hg update' to get a working copy)If we look at our repository history now with the hg log --graph command we can see that the @ character marks the revision that our working copy of the files is at and the revision that we pulled from Bitbucket is above that, meaning it has not yet been applied to our working files:
$ hg log --grapho changeset: 3:2e9c23a9090d
| user: Vlad Dracula <vlad@tran.sylvan.ia>
| date: Mon Apr 14 16:56:42 2014 -0400
| summary: Some notes about Pluto
|
@ changeset: 2:43da31fb96ec
| user: Vlad Dracula <vlad@tran.sylvan.ia>
| date: Mon Apr 14 16:37:12 2014 -0400
| summary: Thoughts about the climate
|
o changeset: 1:9b3b65e50b8c
| user: Vlad Dracula <vlad@tran.sylvan.ia>
| date: Mon Apr 14 15:52:43 2014 -0400
| summary: Concerns about Mars's moons on my furry friend
|
o changeset: 0:72ab25fa99a1
user: Vlad Dracula <vlad@tran.sylvan.ia>
date: Mon Apr 14 14:41:58 2014 -0400
summary: Starting to think about MarsTo apply those changes we use hg update (as Mercurial helpfully suggested at the end of the hg pull process):
$ hg update1 files updated, 0 files merged, 0 files removed, 0 files unresolvedYou can use hg log --graph again to that the @ has been moved to changeset 3 which tells us that our working copy is up to date.
Here is what our 2 local repositories and our Bitbucket repository look like now, showing how the pluto.txt file has been copied from Bitbucket to our planets/ repository clone:

After Pulling Change to Local Repository
In practice, we would probably never have two copies of the same remote repository on our laptop at once. Instead, one of those copies would be on our laptop, and the other on a lab machine, or on someone else’s computer. Pushing and pulling changes gives us a reliable way to share work between different people and machines.
Bitbucket Timestamp
Create a repository on Bitbucket, clone it, add a file, push those changes to Bitbucket, and then look at the timestamp of the change on Bitbucket. How does Bitbucket record times, and why?